


Restoration Commission: Sanding, Sculpting, and 3D Printing Precision in Action
There’s something satisfying about turning a broken piece of history into something whole again—especially when it involves sculpting, sanding, and the kind of detail work I’ve come to love through over 35 years of miniature painting. This article takes you through the latest phase of a restoration commission project I’ve been working on—a stunning but damaged ceramic vase—and how the precision I’ve gained from 3D printing and painting miniatures helped bring it one step closer to completion.
Whether you’re into tabletop gaming, art restoration, or just enjoy seeing creativity in action, this story is for you.
Returning to Work After a Break
After taking a much-needed Easter break with my family, I returned to the studio with fresh eyes and a well-dried piece of sculpture waiting for me. I had left the clay additions on the broken petals of the vase to cure properly—around two weeks in total.
It’s always a bit nerve-wracking returning to a piece after time away. My first instinct was to jump into sanding, but as soon as I inspected the larger petals, I realized they needed a bit more love before I could get to that stage.
Adding More Clay Before Sanding Begins
Why “Too Much” Is Actually Just Right
One of the lessons I’ve learned from years of painting and sculpting miniatures—and from trial and error on other restoration commissions—is that it’s always better to add a little extra material than too little. You can always sand it down. You can’t add more after the fact without restarting.
Some of the sculpted petals were too thin or had small holes that would’ve caused issues during sanding. So I took my time adding more clay and smoothing it out carefully using water and sculpting tools. It’s a bit like detailing a custom miniature before moving to primer—you want it clean and solid before the next step.

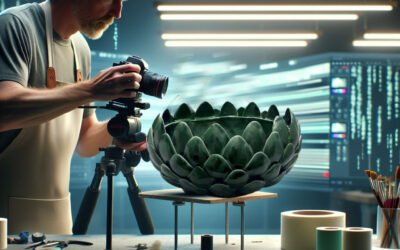
Restoration-Commission-Ceramic-Green-Vase-SANDING -@-dressart3d.com
The Sanding Phase: Where Precision Matters
Starting with 160 Grit for Form
Once the added clay had dried, I masked off the nearby original petals to protect their fragile paint and glaze. I knew from past work that 160 grit sandpaper could easily scuff the original surface, so I proceeded slowly and carefully.
Each petal was sanded one by one. I shaped the rough clay into curves that matched the original design. I worked the base of each petal to be a bit thicker, gradually tapering it toward the delicate tips. This step was incredibly slow, but vital. One wrong move and I’d be starting all over again.
Moving to 240 Grit for Smoothness
With the main shaping complete, I switched to a 240 grit paper to smooth the surface and blend the sculpted petals into the surrounding original material. This is the “finesse” stage—similar to dry brushing highlights on a 28mm model. Every tiny bump or uneven line had to be softened out.
After about five hours of sanding, the results were exactly what I was hoping for: clean, sharp, and true to the original shape.

Restoration-Commission-Ceramic-Green-Vase-SANDING -@-dressart3d.com
Dusting and Sealing the Clay Work
Before sealing the sculpted areas, I carefully dusted the entire vase using a soft, wide paintbrush to remove all residue. Then came one of the most important steps—sealing the clay.
I applied a thin coat of super glue to the sculpted petals. Not only does this harden the surface and protect it from wear, but it also gives the clay nearly the same structural integrity as the original ceramic. Think of it as adding a protective varnish to a painted miniature—it strengthens while preserving the work you’ve done.

Restoration-Commission-Ceramic-Green-Vase-SANDING -@-dressart3d.com
Restoration Commission: Why It’s More Than Just Repair Work
This isn’t just about patching up a vase. Every restoration commission I take on is a chance to preserve a piece of history—and to use the same skills I’ve developed through years of working in 3D printing and miniature painting.
The attention to form, the patience to smooth every corner, and the eye for color blending… it all comes from my passion for miniatures. And if you’re someone who appreciates detailed craftsmanship or wants show-stopping models for your tabletop gaming, I truly believe you’ll appreciate the kind of work we do at dressart3D.com.
Love What You See? Support Us at dressart3D.com
We’re not just doing restoration work—we’re also building, printing, and painting unique 3d printed miniatures, merch, and collectibles you won’t find anywhere else.
🎯 Want a centerpiece miniature for your RPG group?
🎯 Looking for exclusive artwork and t-shirts?
🎯 Don’t have time to paint, but still want jaw-dropping minis?
👉 dressart3D.com – Unique 3dPrinted Painted Miniatures & merch is the place.
Every purchase you make helps fund more creative projects like this one. Whether it’s a fully painted miniature, a stylish T-shirt, or another unique collectible, you’re directly supporting our mission to bring more art and stories to life.
What’s Next in This Restoration Commission?
Now that the petals are fully sculpted, sanded, and sealed, the real test begins: color matching and painting. The original vase has a beautiful gradient from green to white, with a very soft watercolor-like texture. Reproducing that effect will take a lot of trial, blending, and careful brushwork.
I’ll be documenting that stage soon—so if you’re into miniatures, painting, or restoration work, stick around!
Final Thoughts – Small Tools, Big Results
This part of the restoration commission felt a lot like prepping a model for a big convention. The stakes were high, and there was no room for shortcuts. But seeing the sculpted petals now, fully formed and strong, makes it all worth it.
Got questions or want to commission a piece yourself? Or maybe you just want professionally painted miniatures for your next game night?
📩 Reach out anytime at contact@dressart3d.com
🎨 And don’t forget to browse our full collection at dressart3D.com – Unique 3dPrinted Painted Miniatures & merch
#RestorationCommission #3DPrinting #MiniatureRestoration #MiniatureArt #dressart3d #TabletopMiniatures #Sculpting #ArtRestoration #RPGMiniatures #WIP
———————————————————————————————–
Thanks with a Gift!
Thanks for sticking with this long read. If you managed to arrive to this point I sincerely think that you found this reading an interesting one and I really appreciate it. As a small token for your interest, may I remind you that if you simply create an account with our online show you will be instantly given a one time, no expiry 10% Discount Coupon. You will be able to find it in the coupon section of the My Account Section in the links section above.
Thanks for appreciating our Art!


This is really interesting, The detail you captured on the petal edges is stunning. Bravo!
Also, I’ve shared your site in my social networks!
Love your use of layering and patience. Well done!
I really enjoy following this project phase by phase.