The Game-Changing Step You’re Missing: Cleaning Your Miniature Before Priming!
Our opinion on Cleaning a Miniature @ Dressart3D.com
The coming article / tutorial is intended as a general guide but has important principals which illustrate why miniature cleaning is a phase of maximum importance, if yuu want your modelling project to be a good one.
Why Cleaning and Preparing Your Miniature Is Essential
Before we dive into the how-tos, let’s talk about why cleaning and preparing your miniature before priming is so crucial even if many, myself included, consider it as my least favorite step of the whole miniature painting hobby. The basics of this process apply to any kind of modelling project, whether you’re working on wargaming miniatures, figures for a role-playing game, or a complex model kit such a garage kit of vehicle model.
When it comes to painting miniatures, models, or figures, there’s one golden rule that I’ve held onto throughout my 35-plus years in the hobby: Preparation is everything. I learned this early on while flipping through one of my first issues of White Dwarf magazine. Back in those days, we didn’t have the luxury of YouTube tutorials or online forums. If you wanted to learn something new, you waited eagerly for the next monthly magazine. And it was in one of those pages that I stumbled upon a quote from the legendary ‘Eavy Metal painter Mike McVey.
He talked about how he had judged countless entries in the Games Workshop Golden Demon competition. He mentioned that many miniatures that were beautifully painted had to be marked down simply because the models weren’t properly cleaned or prepared before being primed. Think about that—a potential award-winning piece getting knocked out of the running because of something as basic as preparation!
This stuck with me. No matter how skilled you are with a brush, an uncleaned, poorly prepared model will always fall short. Visible seam lines, air bubbles, or leftover mold residue can make even the most detailed paint job look amateur. So today, I’m going to walk you through the game-changing step you might be missing: cleaning your miniature before priming. Whether you’re a beginner or just looking to improve your technique, these tips will set you up for success.
And remember, if you’re ever working on an important project or feel like you need some extra help, you can always seek out professional services. Artists at Dressart3D.com specialize in bringing miniatures to life, and they can take your project to the next level with a commission. They are also very eager to help so do not hesitate to contact us @ contactr@dressart3d.com .
Why Cleaning and Preparing Your Miniature Is Essential
Before we dive into the how-tos, let’s talk about why cleaning and preparing your miniature before priming is so crucial even if many, myself included, consider it as my least favorite step of the whole miniature painting hobby. The basics of this process apply to any kind of modelling project, whether you’re working on wargaming miniatures, figures for a role-playing game, or a complex model kit such a garage kit of vehicle model.
The Consequences of Skipping This Miniature Modelling, Game-Changing Step
Let me put it this way: You wouldn’t paint a house without cleaning the walls first, right? The same principle applies to your miniature. If you skip the cleaning and preparation steps before priming, you’re basically setting yourself up for disappointment. Here’s why:
-
Seam Lines:
These are the lines left behind where the two halves of the mold meet. If you don’t remove them, they’ll stick out like a sore thumb under the paint.
-
Air Bubbles:
These can leave tiny craters in your model’s surface, which will become even more noticeable once the paint is on.
-
Mold Residue:
This oily substance can prevent your paint from sticking properly, leading to a splotchy or uneven finish.
Mike McVey wasn’t exaggerating when he said that a poorly prepared model can ruin your chances in a competition. And whi

Blog @ Dressart3d.com – Tools – The Importance of cleaning a Miniature
le you might not be entering the Golden Demon, I’m guessing you still want your miniatures to look their best.
A Lesson from the Pros
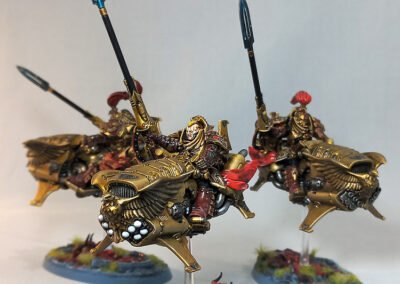
The pros know that even the tiniest flaw can ruin a masterpiece. That’s why they spend so much time on preparation. I’ve seen professional painters, like the artists at Dressart3D.com, take a model that looks pretty good out of the box and transform it into something breathtaking—all because they take the time to properly clean and prepare it before priming.
Tools You’ll Need for This Miniature Modelling, Game-Changing Step
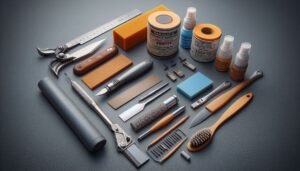
Now that you know why this step is so important, let’s go over the tools you’ll need. Luckily, you don’t need anything too fancy—just some basic tools that will make a big difference.
Miniature Cutting Knife
A sharp cutting knife is your best friend when it comes to removing seam lines and trimming any excess material. I recommend something with a comfortable handle, as you’ll be using it a lot. This best friend can transform in an enemy so always learn how to use a cutting knife safely. A good rule of thumb is to always cut outwards facing away from your body.
Miniature Files and Sandpaper
Files and sandpaper are essential for smoothing surfaces and rounding out parts. You’ll want to have a variety of grits on hand—from 350 to 1000 grain—so you can start with something coarse and work your way up to a fine finish.
Washing Liquid
To get rid of any mold release agents or other residues, you’ll need a good washing liquid. I usually use a mild dish soap, but you can also find specialized model-cleaning solutions if you are richer than me 😊.
Miniature Putty and Liquid Filler
These are your go-to materials for filling in air bubbles, gaps, and any other imperfections. There are lots of options out there, but I’ve always had good results with two-part epoxy putty.
Old Toothbrush
An old toothbrush might seem like an odd tool, but it’s perfect for scrubbing away debris and residue from all those hard-to-reach areas. Plus, it’s gentle enough that it won’t damage your model.
Glue and Pinning Materials
If your model comes in multiple parts, you’ll need some good-quality glue. For larger or heavier parts, I recommend pinning, which involves drilling small holes and inserting metal rods for extra stability.
The Cleaning and Preparation Process: The Miniature Modelling, Game-Changer You’ve Been Missing
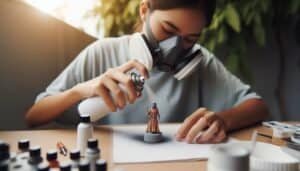
With your tools in hand, let’s get to work. Here’s a step-by-step guide to cleaning and preparing your miniature before priming.

Blog @ Dressart3d.com – The Importance of cleaning a Miniature
Step 1: Removing Miniature Seam Lines
Seam lines are those pesky ridges left where the two halves of the mold meet. They’re usually most noticeable on rounded surfaces like helmets, arms, and legs.
- Inspect the Miniature: Start by carefully inspecting your miniature. Run your finger or better your nails 😊 along the edges to feel for any raised lines.
- Use the Cutting Knife: Hold the knife at a slight angle and gently scrape along the seam line. Take your time—you want to remove the line without gouging the surface and more importantly hurting yourself. This is the most dangerous part of the process so take care.
- Sand the Area: Once the seam line is removed, use a fine-grain sandpaper (around 600 to 1000 grit) to smooth the area. This will ensure that the paint goes on evenly.
Step 2: Filling Air Bubbles from a Miniature
Even the highest quality models can have tiny air bubbles, especially if they’re made of resin. These need to be filled before you start painting.
- Identify the Bubbles: Check the surface of your model for small pits or holes. These are the air bubbles that need filling.
- Apply Putty: Mix up a small amount of putty and use a toothpick or sculpting tool to fill the bubbles. Overfill them slightly, as the putty will shrink a bit as it dries.
- Let It Dry: Allow the putty to dry completely. This might take a few hours, depending on the type of putty you’re using.
- Sand Smooth: Once dry, use fine-grain sandpaper to smooth the surface.
Step 3: Sanding and Smoothing
Even if your model doesn’t have obvious flaws, a quick sanding will help the paint adhere better and give you a smoother finish.
- Round Out Parts: For rounded areas like helmets or shoulder pads, use a medium-grain sandpaper (around 350 grit) to gently smooth the surface.
- Finish with Fine Sandpaper: Follow up with a finer grain (600 to 1000 grit) to polish the surface.
- Residue can be then cleaned with a toothbrush: For better results dip the toothbrush in water. It will clean plastic and resin residues better for you to see the result of your work.
Step 4: Test-Fitting and Assembly a Miniature
Before gluing anything together, it’s a good idea to do a dry fit. This helps ensure that all the parts fit together properly.
- Dry-Fit the Parts: Temporarily assemble the parts to check for fit. Make sure everything lines up correctly and that there are no large gaps.
- Adjust if Necessary: If something doesn’t fit quite right, use your file or sandpaper to make adjustments.
- Glue the Parts Together: Once you’re happy with the fit, use your glue to assemble the parts. If the parts are large or heavy, consider pinning them for extra stability.
Step 5: Gap Filling and Sculpting
After assembly, you might notice small gaps between parts. These need to be filled to create a seamless appearance.
- Apply Putty to the Gaps: Just like with the air bubbles, use putty to fill any gaps between the assembled parts. Don’t worry if it’s a bit messy—you can clean it up later.
- Sculpt the Putty: While the putty is still soft, use a sculpting tool or your knife to shape it to match the surrounding details.
- Let It Dry and Sand Smooth: Once the putty is dry, sand it smooth so that it blends in with the rest of the model.
Step 6: Final Washing
Before you prime, give your model one last wash to remove any remaining debris or oils.
- Soapy Water: Fill a small container with warm water and add a drop of dish soap.
- Scrub with a Toothbrush: Use your old toothbrush to gently scrub the entire model. Pay extra attention to crevices and details and be delicate with thin parts. 😊
- Rinse and Dry: Rinse the model under warm water and let it air dry completely.
Preparing a Miniature for Priming
Now that your miniature is clean and fully prepped, it’s almost time to start painting. But first, let’s talk about priming.

Blog @ Dressart3d.com – The Importance of cleaning a Miniature
The Importance of Priming a Miniature
Priming is the process of applying a base coat of paint to your model before you start adding colors. It helps the paint adhere better and provides a uniform surface to work on. Plus, it can help reveal any spots you might have missed during the cleaning process.
First Coat of Primer
When it comes to priming, less is more. Start with a light coat in a neutral color, like grey or white.
- Light, Even Coats: Hold the primer can about 12 inches away from the model and apply a thin, even layer. Make sure to rotate the model as you go, so you cover all angles without overloading any one area.
- Inspect After Priming: Once the primer is dry, give your model a close inspection. This is the time to spot any areas that might need a little extra attention, like a seam you missed or a bubble you didn’t quite fill.
If you find anything that needs touching up, go back through the relevant steps to fix it. Once you’re satisfied, your miniature is ready for the final priming and, eventually, painting.
A more detailed tutorial on priming will follow.
Conclusion: Don’t Skip This Miniature Modelling, Game-Changing Step!
Cleaning and preparing your miniature before priming is the game-changing step that can elevate your painting from good to great. It’s a simple but crucial part of the process that ensures your hard work doesn’t go to waste. And remember, if you’re tackling an important or complex project, don’t hesitate to reach out for professional help. The artists at Dressart3d.com can help you achieve a flawless finish that will truly make your miniatures stand out.
Now that your model is ready, it’s time to move on to the fun part—painting! But that’s a topic for another day. Happy painting!
Thanks with a Gift!
Thanks for sticking with this long read. If you managed to arrive to this point I sincerely think that you found this reading an interesting one and I really appreciate it. As a small token for your interest, may I remind you that if you simply create an account with our online show you will be instantly given a one time, no expiry 10% Discount Coupon. You will be able to find it in the coupon section of the My Account Section in the links section above.
Thanks for appreciating our Art!


I’m new to painting, and I didn’t realize how important cleaning was! This article explained it perfectly.
Great beginner advice! I was skipping the cleaning step and wondering why my paint jobs looked rough. Thanks for this!
Never paid much attention to cleaning before priming, but after reading this, I realize why my minis didn’t turn out smooth
James
As an experienced painter, I can confirm this is one of the most overlooked steps! Great advice for anyone wanting to improve their painting results.
Thank to all. Glad I can help beginners with these few words and that Pros agree with me.