Restoration Commission: Saving a Ceramic Nativity Icon – Crack Consolidation
Some restoration projects are straightforward, while others truly put your skills, patience, and creativity to the test. This restoration commission of a ceramic nativity icon falls into the latter category. From the moment I first laid eyes on it, I knew this would be one of the toughest projects I had ever taken on.
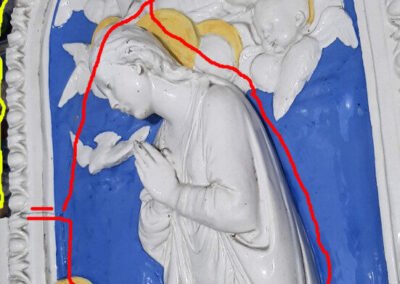
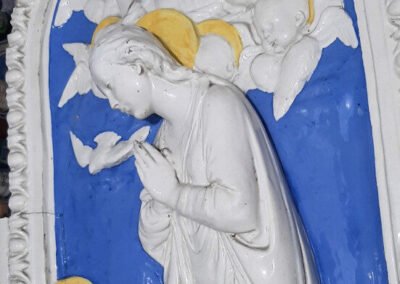
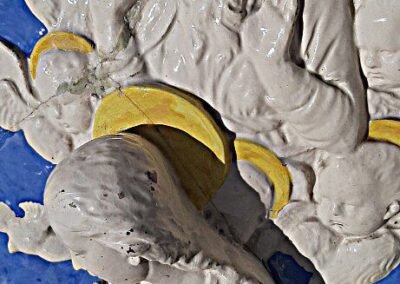
This piece was not just broken—it was hanging on by a miracle. A deep structural crack ran in a full circle around the entire piece, threatening to split it into multiple parts. The only thing keeping it together was the thick ceramic frame, which miraculously survived the impact apart from a totally shattered part at the top of the icon.
This article details the crack consolidation phase—the first crucial step in ensuring that this restoration commission doesn’t end in disaster. If you’re interested in miniature painting, restoration work, or custom commissions, be sure to follow along. And don’t forget, you can explore unique fully painted models and exclusive merch at DressArt3D.com!
The Challenge – A Structural Crack Holding on by a Thread
Why This Restoration Commission Was So Risky
When I first assessed the ceramic nativity icon, I quickly realized I was dealing with a worst-case scenario in ceramic restoration.
The circular structural crack ran from one side to the other, and although the piece was still holding together, the ceramic was shifting slightly along the break line. This meant that any movement—even the slightest mishandling—could result in a complete break. If that happened, putting the pieces back together perfectly would have been nearly impossible.
I had two major concerns:
1️: Applying glue inside the crack wasn’t an option. Since the sculpture was still in one piece, I couldn’t reach the inner break points.
2️: If the bond wasn’t strong enough, the piece could collapse under its own weight. Traditional ceramic glues alone wouldn’t hold up long-term.
I needed a solution that would stabilize the entire piece without breaking it apart further.
Nativity-Restoration-@-dressart3d.com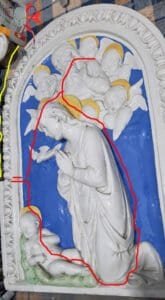
The Plan – An Unconventional but Effective Solution
A Lesson from an Old Teacher
While searching for a way to reinforce the piece, I recalled a technique my electrician teacher once showed me—using medical tape drenched in super glue to create a fiberglass-like reinforcement.
This method works by allowing the super glue to soak into the medical tape, hardening into a rock-solid structure. When properly applied, it can be stronger than regular glue alone and acts as a structural support across the break line.
Given that traditional ceramic repair methods wouldn’t work here, I decided to give this method a shot.
Step-by-Step Process for Crack Consolidation
Step 1 – Applying the First Layer of Super Glue
Since super glue dries quickly, I worked in small sections to ensure the best results:
✅ I applied a thin layer of Wurth’s Super Glue (one of the strongest available) directly along the crack line.
✅ Using an old brush, I spread the glue evenly and to the width that equaled that of the medical tape, making sure to push it into the crack where possible.
Step 2 – Reinforcing with Medical Tape
Once the first glue layer was down, I quickly applied medical bondage tape over the entire crack line before the glue could fully cure:
✅ I pressed the tape firmly into the glue to ensure maximum absorption.
✅ The goal was to let the tape soak up as much glue as possible, creating the first solid bond with the ceramic icon.
Step 3 – Drenching the Tape in Super Glue
This is where the magic happens!
✅ Again, before the first super glue layer dried. I poured another generous layer of super glue over the tape, fully saturating it.
✅ The top and bottom glue layers fused together, locking the tape in place.
✅ This method created a reinforced, fiberglass-like bond, making the crack significantly stronger than glue alone.
Step 4 – Overlapping for Extra Strength
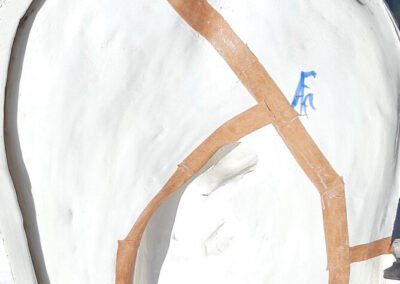
To ensure maximum reinforcement, I repeated the process across the entire back side of the sculpture:
🔹 Overlapping tape strips to create one continuous bond.
🔹 Allowing each layer to fuse together before moving to the next.
🔹 Working slowly and carefully, ensuring everything was secure and fully set.
Nativity-restration-consolidation-@-dressart3d.com_.jpg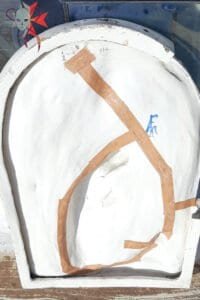
Securing the Front Side of the Crack
Since I couldn’t apply the medical tape method to the front, I took a different approach:
✔️ I applied a thin layer of super glue over the entire front crack line.
✔️ This sealed the crack while keeping the surface smooth enough to be sanded later.
This method would allow me to later refinish and paint over the repaired area, helping it blend into the original ceramic finish.
The Waiting Game – Letting the Bond Fully Cure
Once the crack was fully reinforced, I let the piece cure for 48 hours in direct sunlight. This was essential for:
🔹 Ensuring the super glue had fully hardened.
🔹 Letting fumes evaporate before working on the next stage. (SAFETY NOTE: Always wear a mask when working with super glue!)
After two full days, it was time to test if the method had worked.
The Results – A Reinforced and Stable Icon!
After waiting anxiously, I finally tested the piece and was beyond relieved:
✅ The ceramic was completely stable—no shifting or movement.
✅ The crack was reinforced and no longer a weak point.
✅ The sculpture was ready for the next stage of restoration.
This restoration commission was now on track for a full recovery!
What Comes Next? Follow the Full Restoration Commission Journey!
With the crack consolidated, the next phases of the restoration commission will include:
🔹 Sanding & Refinishing the Crack Line – Making the repair as invisible as possible.
🔹 Rebuilding the Missing Frame Section – A huge challenge that will require sculpting and shaping new ceramic-like materials.
🔹 Color Matching & Painting – The hardest part of restoring ceramic surfaces to their original look.
If you love challenging restorations, follow along for the next update!
And if you’d like to support more projects like this, check out DressArt3D.com – Unique 3D Printed Painted Miniatures & Merch!
✅ Professionally painted miniatures for tabletop gaming
✅ Print-on-demand t-shirts, mugs, and collectibles
✅ Custom commissions for unique creations
Every purchase helps fund future restoration and miniature design and printing projects—so let’s keep bringing beautiful artwork back to life together!
Final Thoughts – A Major Step Forward in This Restoration Commission
This ceramic nativity restoration commission is one of the hardest projects I’ve tackled, but this first phase was a success!
What started as a fragile, near-collapsing piece is now structurally sound and ready for further work.
There’s still a long road ahead, but with careful planning and patience, I hope to bring this cherished icon back to a display-worthy state.
Stay tuned for more updates, and thank you for following along on this restoration journey!
———————————————————————————————–
Thanks with a Gift!
Thanks for sticking with this long read. If you managed to arrive to this point I sincerely think that you found this reading an interesting one and I really appreciate it. As a small token for your interest, may I remind you that if you simply create an account with our online show you will be instantly given a one time, no expiry 10% Discount Coupon. You will be able to find it in the coupon section of the My Account Section in the links section above.
Thanks for appreciating our Art!






Restoring ceramic is no joke! How did you manage to bond the cracked pieces without breaking them further?
Luckily the pieces remained as one whole piece. Only a section of the left part of the frame had broken off and i will have to rebuild it.
The super glue and medical tape technique is genius! I never would have thought of that!
How do you prevent the ceramic from crumbling when sanding the cracks?
I’ve followed many restoration projects, but working with ceramic always seems to be one of the hardest materials to fix. The cracks alone would be enough to scare most people away, but the fact that this piece has a **curved surface** and delicate details makes it even more challenging!
I love that you thought outside the box with the reinforcement technique. Most people would have just used glue and hoped for the best, but adding the medical tape layer really seems like it will provide a much stronger hold. Do you think this method would work for ceramic plates or decorative vases, or is it only suitable for larger, more solid pieces like this Nativity icon?
I can’t wait to see the next phase of the restoration—especially how you’ll handle the painting and blending to hide the repaired cracks. Amazing work!
The method can be used on any surface big or small that super glue adheres to.
The curved crack makes this restoration even more difficult—how did you align the pieces so perfectly?
Simply the piece were not broken apart except for the left part of the frame which I will have to rebuild.