

Restoration Commission: Pinning & Sculpting the Vase Begins
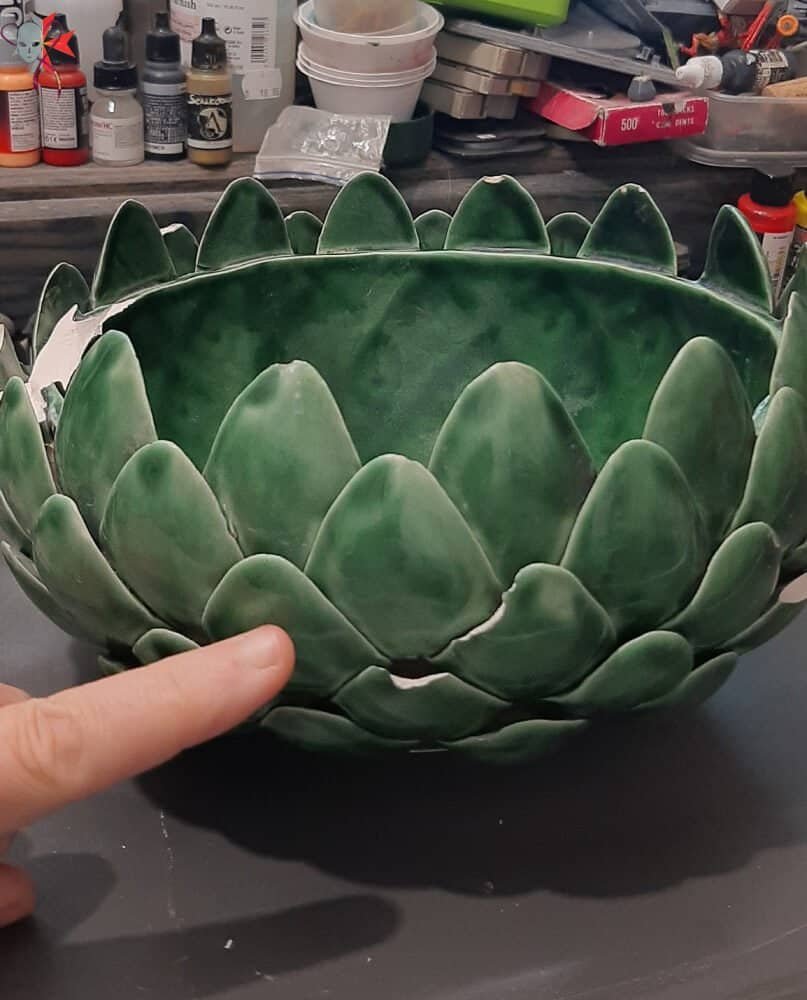
Some projects look simple at first glance, but once you roll up your sleeves, they turn out to be far more complicated than expected. This is exactly the case with my latest restoration commission—a beautifully detailed but damaged green ceramic vase with overlapping flower petal design. This piece came from Villa Bronja, an antique Maltese residence, and was entrusted to me by Steve P., the same client who commissioned the restoration of the large Nativity icon.
Let’s just say, when Steve handed me this vase, my heart skipped a beat—not from excitement, but from sheer nervousness. Still, I accepted the challenge.
First Phase of the Restoration Commission – Drilling and Pinning
Why Drilling and Pinning Is a Must
This vase has no major cracks, but five of its delicate petal tips are broken—and their pieces are completely missing. That means reconstruction is needed, and to do that properly, a solid internal support system is essential.
Before sculpting anything, I had to drill small but precise holes to insert metal rods (or pins). These act as anchors for the clay I’ll use to recreate the missing petal shapes. It might sound like a small step, but without it, the sculpted pieces would be too fragile to last.
The Risky Business of Drilling Ceramic
Ceramic is tricky. On one hand, it’s incredibly hard and requires a carbide bit to drill through. On the other, it’s brittle—apply too much pressure or vibrate the surface, and it can crack instantly.
Each hole took serious time and concentration. I had to support the vase firmly without putting stress on the thin petals. I drilled very slowly and steadily, often holding my breath with every movement. Even after 35+ years of working with miniatures and doing restoration work, ceramics never stop testing my nerves.

Restoration-Commission-Ceramic-Green-Vase-Pinning -@-dressart3d.com
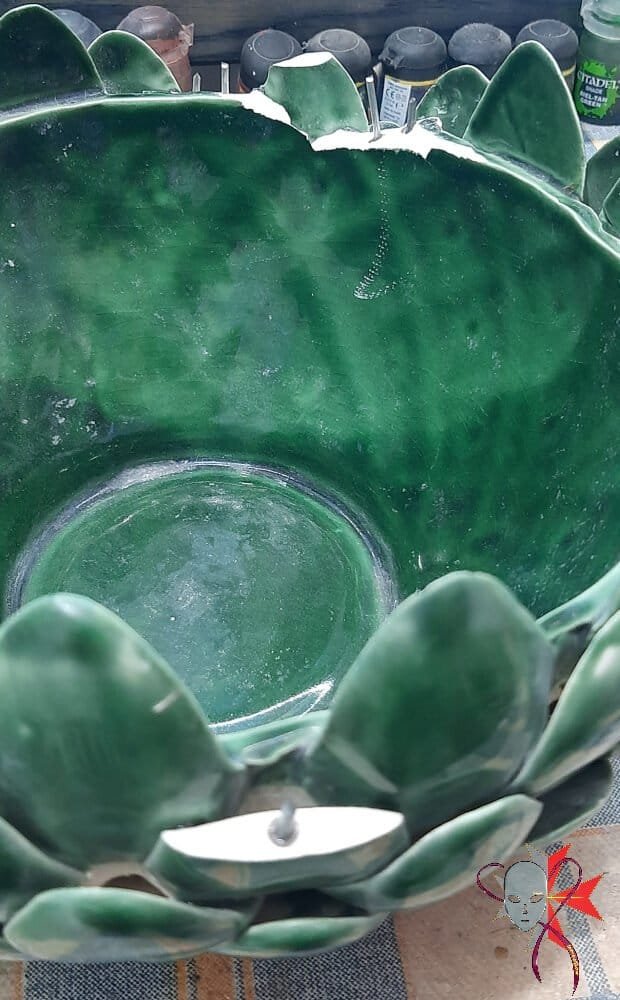
Securing the Pins for a Strong Base
Once I was happy with the holes, I inserted carefully measured metal pins into each one, gluing them with high-grade super glue. Then, I let the piece cure overnight, giving the glue time to form a rock-solid bond.
It may not look like much at this point, but without these hidden reinforcements, the next steps would never hold up.

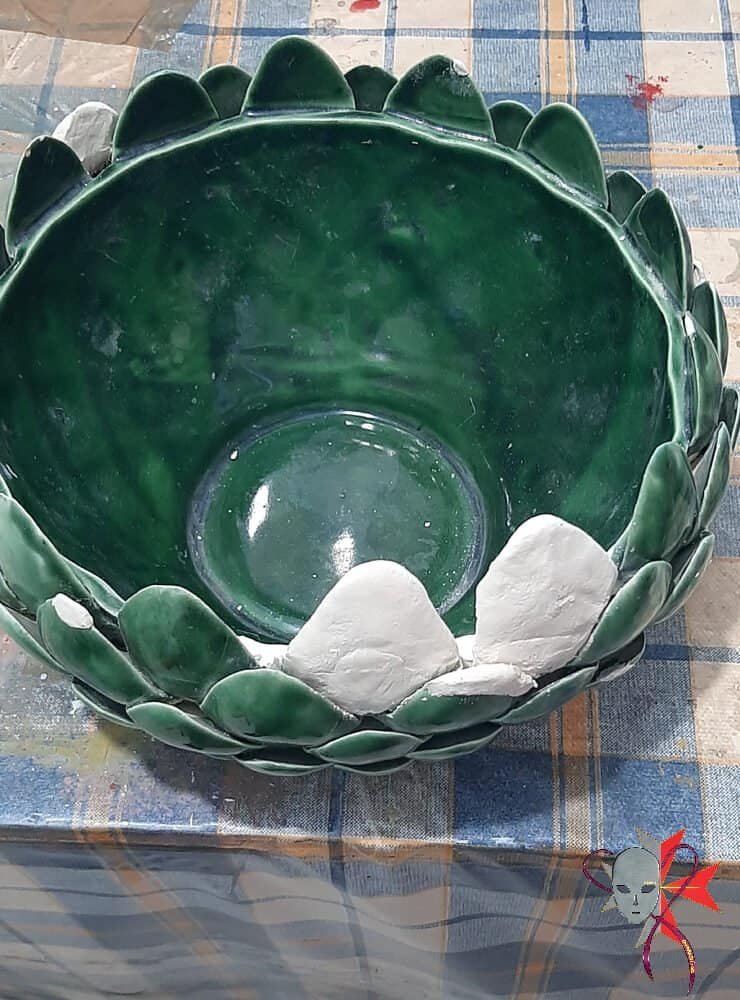
Second Phase of the Restoration Commission – Sculpting the Missing Petals
Choosing the Right Clay
I used air-drying clay for the sculpting stage. It’s a great choice for ceramics because:
- It’s easy to mold and shape
- It hardens without needing a kiln
- Once dry, it can be sanded smooth to blend with the original piece
For this first layer, I wasn’t aiming for perfect detail. The goal was to create the base shape of the missing petals and fill any damaged ones.
Rough Sculpting: Laying the Foundation
With the metal pins acting as internal supports, I applied a generous amount of clay and began shaping the petals. At this stage, it’s like blocking in shapes when painting miniatures—I’m not focused on fine detail yet, just getting the right form and thickness.
And yes, the petals on this vase are sculpturally beautiful but deceptively difficult. Even at this early stage, I could tell that the final sanding and shaping will require just as much finesse as a full custom sculpture.

Restoration-Commission-Ceramic-Green-Vase-Rough Sculpting-@-dressart3d.com
Why Sculpting in Layers Matters
One important lesson I’ve learned over the years is that layering is key. Trying to get everything done in one go almost always leads to sagging or cracking clay. I’ll let this first layer dry completely, then add more clay next week to build up the shape before I even think about smoothing or painting.
What’s Coming Next in This Restoration Commission
Next Step: Sanding and Refining the Sculpt
Once the clay fully cures, I’ll begin carefully sanding it to match the soft curves of the original petals. This will be one of the most time-consuming parts, especially around the tips where the structure is fragile. Patience will be key.
Then Comes the Real Test: Color Matching and Painting
Later in the restoration, I’ll face what I believe is the hardest part: replicating the vase’s delicate fade from green to white. The original finish has a watercolor-like quality, and duplicating that on a newly sculpted section without it looking obvious is going to be a serious challenge.
Why I Take On These Restoration Commission Projects
Preserving History One Piece at a Time
There’s something deeply satisfying about restoring a broken piece and knowing it’ll bring joy to its owner once again. Whether it’s a tabletop miniature or a historical ceramic vase, I approach every project with the same mindset: respect the original, enhance where needed, and leave no trace of the repair work.
Miniatures, Merch, and More at DressArt3D
You might be wondering why a guy who paints miniatures is now spending hours restoring ceramic vases. The answer is simple—years of honing detail, precision, and color blending on 28mm miniatures gave me the skillset to take on big restoration challenges like this one.
If you’re into tabletop gaming or love exclusive artwork, be sure to check out our latest fully painted miniatures, t-shirts, and collectibles at
👉 dressart3D.com – Unique 3dPrinted Painted Miniatures & merch
Every purchase directly supports more creative restoration commissions and lets us keep telling these stories!
Final Thoughts – A Good Start on a Great Challenge
So far, this restoration commission is progressing well, but I know the hardest parts are still ahead. The pinning and initial sculpting phases laid a solid foundation—but now comes the slow work of refining, smoothing, and eventually painting everything to blend perfectly.
If you’re curious about restoration, miniature painting, or simply enjoy behind-the-scenes looks at creative problem-solving, stay tuned. The next post will cover sanding and smoothing the sculpted parts—and hopefully getting closer to a vase that looks whole again.
Got questions about this project or want to discuss a custom restoration commission of your own?
📩 Feel free to reach out at contact@dressart3d.com.
And again, don’t forget to explore dressart3D.com and help support projects like this with your purchase!
———————————————————————————————–
Thanks with a Gift!
Thanks for sticking with this long read. If you managed to arrive to this point I sincerely think that you found this reading an interesting one and I really appreciate it. As a small token for your interest, may I remind you that if you simply create an account with our online show you will be instantly given a one time, no expiry 10% Discount Coupon. You will be able to find it in the coupon section of the My Account Section in the links section above.
Thanks for appreciating our Art!


0 Comments