Miniature Painting Guide: Bringing the 3-in-1 Mystical Gateway Portal Model to Life
After designing and printing the 3-in-1 Mystical Gateway Portal Model, it’s time for my favorite part miniature painting! This isn’t just about adding color; it’s about storytelling and making every detail pop. You can read the full story of the design and 3D printing process on my blog.
If painting isn’t your thing, you can still add this model to your collection fully painted from DressArt3D.com—but hurry! These limited-edition pieces go fast due to the intricate design.
Let’s dive into the miniature painting techniques I used to create this magical, nature-inspired gateway, with tips to help you develop a vision, plan, and approach that will serve you on all kinds of miniature painting projects.
———————————————————————————–
Setting Your Vision and Forming a Plan for Miniature Painting
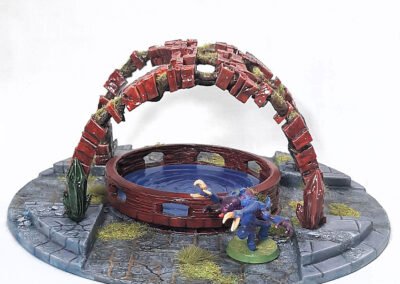
Before grabbing a brush, I always start with a clear vision. Miniature painting is about building a complete scene with a story. With the 3-in-1 Mystical Gateway Portal, I wanted to capture the feeling of an ancient relic reclaimed by nature, radiating mystery and power.
Defining the Vision
For this miniature painting project, I imagined a magical, weathered portal long-abandoned in a forest. Here’s how I approached it:
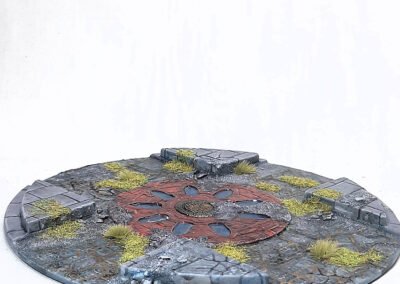
- Environmental Setting: The model had to look at home in a variety of settings—whether in dense forest, desert, or snowy lands. The earth icon base was crucial to make this work.
- Materials and Texture: I envisioned a portal made from glowing crystal blocks with elemental energy.
- Nature’s Reclamation: I planned for foliage and roots to tell the story of an ancient, abandoned structure.
A strong vision enhances the outcome and makes the miniature painting process more enjoyable and focused.
Crafting a Detailed Painting Plan
Once I was clear on my vision, I mapped out the miniature painting process in stages:
- Zenithal Priming: Using gradient priming to establish depth.
- Base Coating: Applying foundational colors.
- Shading and Washing: Adding depth to textures.
- Highlighting: Bringing details to life.
- Final Touches and Clear Coating: Adding protective finishes and foliage.
Though the model is made of three parts, the miniature painting method was consistent across all, with some variation for the earth icon base.
———————————————————————————–
Step 1: Zenithal Priming for Natural Gradients in Miniature Painting
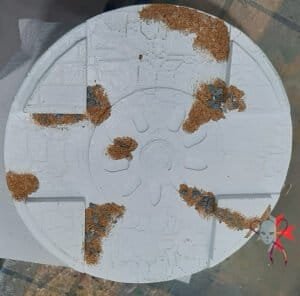
Priming lays a foundation for depth, especially important in miniature painting. I used the zenithal priming technique to create a gradient that guides the later paint layers.
My Approach to Zenithal Priming
- Black Base Coat: Covered the model in black primer for a deep base.
- Mid-Grey Layer: Sprayed mid-grey at a 45-degree angle.
- Top White Layer: Applied white primer directly from above to hit raised surfaces.
Tip: Zenithal priming is especially helpful in miniature painting complex models. This gradient highlights textures and guides where light and shadow should fall naturally. Keep primer layers thin for the best effect.
3 in 1 Mystical Gateway Portal Model – Blog Article @ dressart3d.com
———————————————————————————–
Step 2: Base Coating for Structure and Character
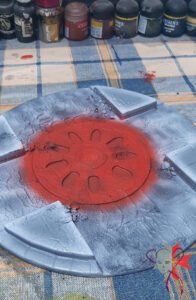
With the base coat, the model’s character starts to show. I wanted ruby-red crystal arches, natural wood-toned roots, and stone texture for the earth icon base, which is essential in miniature painting for a cohesive look across settings.
Airbrushing the Crystal Blocks
For a smooth finish across the crystal arches, I used an airbrush red airbrush paint:
- Thinning the Paint: I diluted the paint to keep the zenithal gradient.
- Gradient Maintenance: The red appeared darker in recesses and lighter on raised surfaces, creating a natural look.
Hand-Painting the Roots
Due to the roots’ intricate detailing, I used a fine brush to hand-paint:
- Diluted Brown Paint: Thinned paint flowed smoothly over the red.
- Focus on Precision: With careful application, I avoided losing the depth from priming.
Tip: Breaks are crucial when working on detailed sections in miniature painting. Stay focused to keep precision sharp.
3 in 1 Mystical Gateway Portal Model – Blog Article @ dressart3d.com
———————————————————————————–
Step 3: Shading and Washing for Depth in Miniature Painting
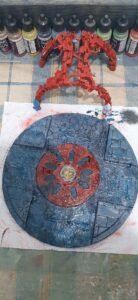
Shading and washes bring out the model’s depth, essential in miniature painting to add realism by simulating shadows.
- Sepia Wash: Added warmth to both crystal and roots.
- Black Wash: Defined deep crevices for standout details.
- Red Glaze: Made the crystals pop with a glowing effect.
- Blue Wash for Stone: Gave the earth icon base a unique depth with a subtle blue wash, followed by black for crevices.
This step gives the Mystical Gateway its nuanced, multi-dimensional look, particularly on highly detailed sections like the roots.
3 in 1 Mystical Gateway Portal Model – Blog Article @ dressart3d.com
———————————————————————————–
Step 4: Highlighting for Depth and Dimension in Miniature Painting
Adding highlights emphasizes detail and depth—time-consuming but rewarding.
Crystal Block Highlights
For the crystal effect, I combined edge and dot highlights:
- Orange Edge Highlights: Defined the edges with an orange highlight.
- White Highlights: White lines and dot accents mimicked light refraction on the crystal surfaces.
These highlights gave the crystal a natural sparkle, ideal for miniature painting.
Root and Stone Highlights
For the roots, I dry-brushed a light brown:
- Wash Blending: After dry-brushing, I applied a wash to blend the highlights, softening them for a more organic look.
- White Dry Brush: A subtle white brush brought out finer textures.
The same method applied to the stone base, though with stronger highlights to emphasize the rugged look.
———————————————————————————–
Final Touches: Clear Coating and Foliage in Miniature Painting
With miniature painting, final touches make a huge difference, from sealing with clear coats to adding finishing details like foliage.
Runic Alphabet and Giant Crystals
- Runic Letters: Painted black initially, then white, leaving a black outline for depth. Afterward, I used yellow and orange ink to create a magical glow effect.
- Giant Crystals: Each primed, unmasked, and base-painted with colors matching the four elements—blue for water, red for fire, green for earth, and white for air.
Clear Coating
Clear coating adds durability. Glossy varnish preserves the crystal sheen, while matte keeps roots looking natural:
- Dual Finish Solution: I used a matte coat on the entire model, then hand-applied gloss to the crystals for that perfect shine.
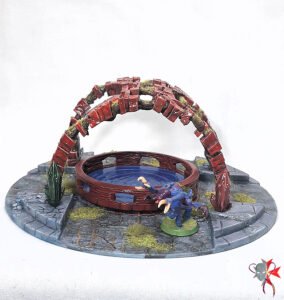
Adding Foliage
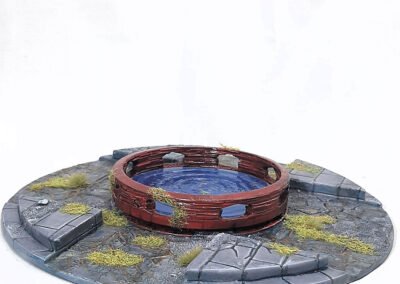
In miniature painting, foliage can add authenticity. Here, synthetic grass brings life to the roots, planned from the design phase. Attempting realistic printed leaves on such an intricate model would have been impractical, so adding foliage as a final touch was the best choice for balance and durability.
3 in one Portal, Well and Icon Scenery @ Dressart3d.com
———————————————————————————–
Key Takeaways for Successful Miniature Painting
Creating the 3-in-1 Mystical Gateway Portal was both challenging and rewarding. Here’s what I learned along the way:
- Set a Clear Vision: Knowing the end goal keeps you focused and intentional.
- Be Patient: Detail takes time, so approach with patience.
- Use Contrast: Combine matte and gloss finishes to emphasize depth and realism.
If you’d like to own a fully painted version of this unique model, head over to DressArt3D.com to get yours—these are limited-edition due to the intensive production process.
———————————————————————————–
3D Animated Model
The model is also available as a fully animated 3d model. Check the video belwo to see the animated version. Contact me contact@dressart3d.com for details.
———————————————————————————–
Thanks with a Gift!
Thanks for sticking with this long read. If you managed to arrive to this point I sincerely think that you found this reading an interesting one and I really appreciate it. As a small token for your interest, may I remind you that if you simply create an account with our online show you will be instantly given a one time, no expiry 10% Discount Coupon. You will be able to find it in the coupon section of the My Account Section in the links section above.
Thanks for appreciating our Art!













The emphasis on planning resonated with me. I’ve rushed into painting before, but this article reminded me to slow down and plan better.
Thanks for the detailed steps! I always struggle with shading, but your explanation of washes makes it seem so achievable.
I never thought about starting with a vision for my miniatures. The idea of planning a scene beforehand is brilliant. Can’t wait to try this!
I’m impressed by the depth of your process. Highlighting each crystal block individually must have taken forever, but the results are worth it!
Thanks for the great comments to all. Yes painting those blocks individually and for x2 took ages of work but it was worthed.
I’ve painted models for my RPG games, but I’ve always struggled with crystals. Your red glaze technique for crystal blocks is great.
Your explanation of using synthetic grass for foliage is brilliant. As an experienced painter, I appreciate tips that simplify complex ideas like this.
The foliage detail blew my mind. I’ve always struggled with making my models feel alive, and your synthetic grass tip is a lifesaver
– Thank you for explaining your process. So helpful for beginners!
This piece is so unique and different from the usual shop stuff.
the detail on this landmark piece is impressive. how did you manage to print that.