3D Printed Setback and Triumph: Restoring a Broken Masterpiece – Headless Horseman Sword Replica Project.
Bringing ideas to life with 3D printed creations is an exhilarating journey. But as with any creative process, challenges often arise. This year, I embarked on one of my most ambitious projects—a 1:1 scale replica of the iconic Headless Horseman sword from Sleepy Hollow. After weeks of meticulous work, disaster struck. A gust of wind sent my newly primed blade crashing to the floor, breaking it in half.
At first, I thought my 3D printed masterpiece was beyond saving. But with patience, creativity, and determination, I turned this heartbreaking setback into a triumph. Here’s how I restored my 3D printed sword and lessons you can apply to your own projects.

“Discover the art of 3D modelling as we recreate the iconic Hessian Horseman Sword from Sleepy Hollow. From inspiration to creation, see how dreams take shape!”
____________________________________________________________________________
The Disaster: A Shattered 3D Printed Blade
How It Happened
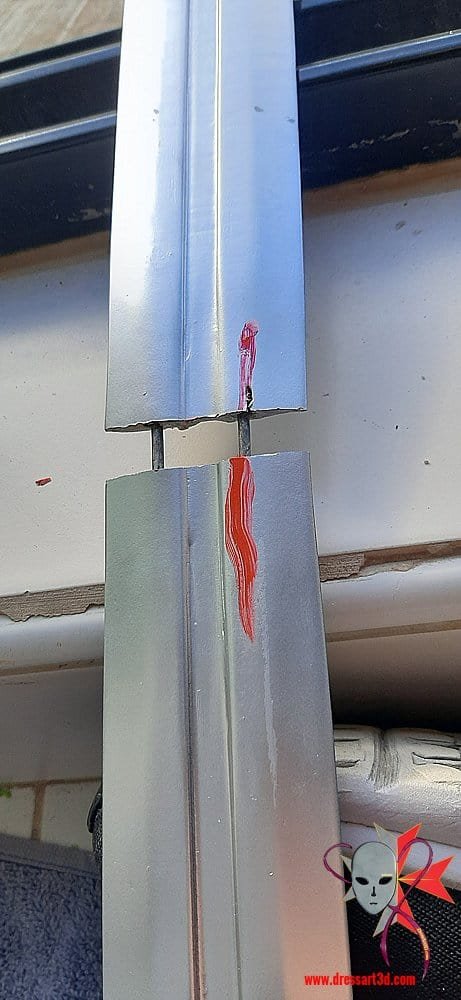
The blade of my 3D printed Headless Horseman sword was drying on a rooftop table after its first coat of paint. A sudden gust of wind knocked over some laundry, which snagged the blade and dragged it to the ground. The impact broke the blade in half at a critical connection point.
You can see the video of the discovery here:
Discovering the shattered blade the next morning was devastating. Weeks of hard work—modeling, printing, assembling, sanding, and priming—seemed wasted. My initial reaction? The project was over.
A Moment of Reflection
I left the broken pieces as they were and stepped away. Sometimes, the best thing you can do after a setback is give yourself time to process. After a day of reflection, I realized how much this project meant to me. With so much effort already invested, I knew I had to try to fix it.
Faced with two options, I chose the second:
- Reprint the blade from scratch, a process that would take weeks.
- Attempt to repair the broken 3D printed blade, even though it would be challenging.
____________________________________________________________________________
Diagnosing the Problem: Why Did My 3D Printed Sword Break?
Weak Points in the Design
Close inspection revealed two major issues:
- Weak PLA Pins: The original male pins printed with PLA weren’t strong enough to withstand the impact.
- Uncured Epoxy: Upon touching the broken section, I noticed that it was still a bit sticky. This meant only one thing. The epoxy I’d used to bond the sections hadn’t fully cured. I likely didn’t mix it thoroughly enough, resulting in a weak connection.
Safety Reminder: Working Safely with Epoxy
When handling epoxy or similar adhesives, always follow these safety tips:
- Wear Gloves: Protect your skin from harmful chemicals.
- Wash Thoroughly: If you come into contact with uncured epoxy, wash your hands immediately with hot water and soap. Follow up with an alcohol wipe.
- Ventilation Matters: Always work in a well-ventilated area or outdoors.
For more safety tips, visit DressArt3D.com or contact us for advice.
____________________________________________________________________________
The Repair Process: Restoring My 3D Printed Sword
Reinforcing the Connection with Metal Pins
To strengthen the broken section, I replaced the weak PLA pins with metal rods:
- Drilling Holes: I carefully drilled holes in both blade sections, ensuring precise alignment.
- Marking Placement: Using red paint, I marked where to drill corresponding holes on the other blade section. This was done by preparing another set of 2 shorter pins which were used as place holder to bring both parts as close to each other as possible to ensure the best alignment possible for drilling the holes. Once done these were replace with the longer pins which were to be glued in place.
- Adjustments: One set of holes was made slightly larger to allow flexibility during alignment.

Replacing the 3d printed pins with metal pins
Preparing the Blade for Reassembly
For a solid bond, I stripped the paint from the connection points up to 5cm, exposing the bare PLA. Adhesives bond best to clean, paint-free surfaces.
Reassembling the 3D Printed Blade
- Mixing the Epoxy Correctly: This time, I mixed the epoxy thoroughly for a strong cure.
- Joining the Pieces: After inserting the metal pins, I applied epoxy generously to both sides and connected the blade sections.
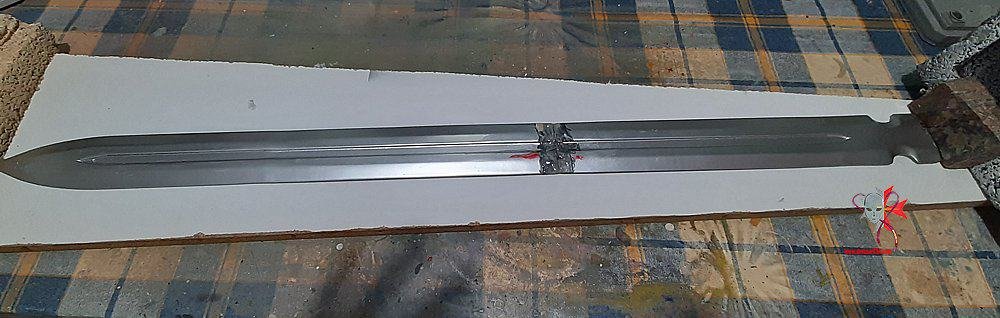
- Aligning with Precision: Using a flat wooden board, I ensured the edges and fuller line were perfectly aligned.
- Once the sections were joined, I applied extra epoxy around the joint to fill gaps and to strengthen the bond. I stretched extra epoxy all over to the 5cm stripped paint. After letting one side dry for 24 hours, I repeated the process on the other side. At this point I did not care for irregularities caused by the epoxy. These will be dealt with by sending.

The blade is now joined and with extra epoxy on the 5cm of stripped paint
____________________________________________________________________________
Overcoming Challenges in 3D Printed Repairs
Spilled Epoxy
During the repair, epoxy spilled and glued the blade to the drying board. Using a thin cutting blade, I carefully separated the two without causing further damage.
Restoring the Fuller Line
The fuller line posed the biggest challenge. Excess epoxy filled the groove, requiring hours of careful sanding and reshaping. Here’s how I fixed it:
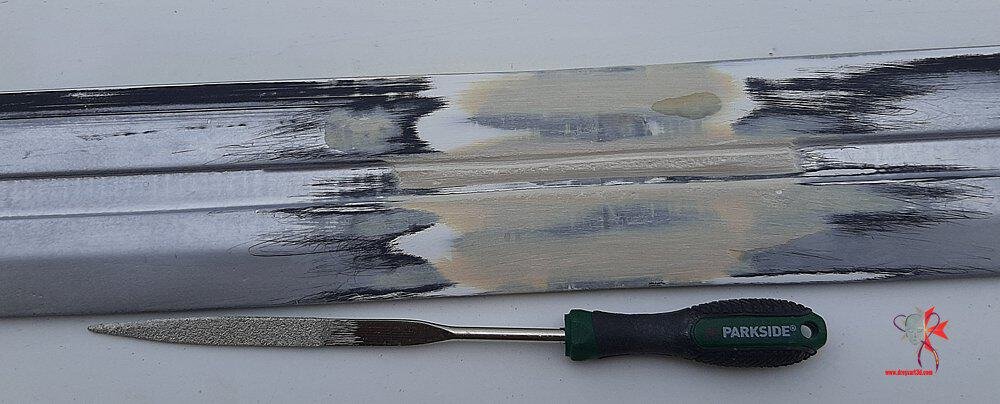
- Applying Car Body Filler: I filled the groove with car body filler to create a smooth surface.
- Sanding for Perfection: Using a straight file, I carefully sanded the filler to align with the original lines.
- Priming Again: Reapplying primer helped identify and fix any remaining imperfections.
- Check the photos below to understand batter this process.

fuller line filled with car body filler.

fuller line sanded down with a Small file to keep the alignment.
____________________________________________________________________________
Lessons Learned from Repairing a 3D Printed Project
Key Takeaways
- Test Your Adhesives: Always mix epoxy thoroughly and allow adequate curing time.
- Reinforce Connections: Metal pins provide superior strength compared to 3D printed PLA pins.
- Patience is Key: Restoring a project takes time, but the results are worth it.

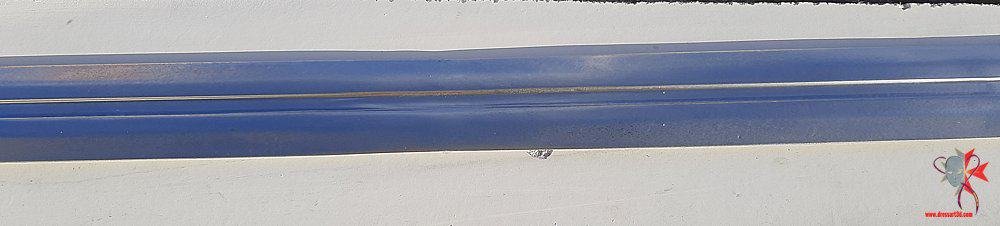
fully repaired blade. Primed to check for flaws.
Why Support DressArt3D?
At DressArt3D.com, we channel our passion for 3D printed designs and miniature painting into every project. Supporting us means more unique creations and inspiring stories like this.
- Explore Our Work: Find professionally painted miniatures, custom designs, and exclusive merch.
- Have Questions? Contact us at contact@dressart3d.com for advice or custom projects.
Your purchases help bring more incredible projects like the Headless Horseman sword to life.
____________________________________________________________________________
What’s Next for the Restored 3D Printed Sword?
Final Assembly and Display
The restored blade is now ready for assembly with the handle and pommel. Stay tuned for the final reveal, including a till now secret custom-designed wall mount for displaying the sword.
Upcoming Projects in 2025
Next year, we’re launching exciting new designs, including:
- Mind Trouble Maiden
- Jakie Miniature
- Land Shark Miniature
- Exclusive print-on-demand designs
____________________________________________________________________________
Final Thoughts: The Joy of Restoring and Creating 3D Printed Projects
Reflecting on this journey, I’m grateful for the lessons learned and the satisfaction of restoring a project I thought was lost. If you’re working on a 3D printed creation or any sort of project that you are passionate about, don’t be discouraged by setbacks. Embrace the process, learn from challenges, and keep creating!
Visit DressArt3D.com to explore our work and support our passion for 3D printed artistry. Let’s make 2025 a year of creativity and innovation!
———————————————————————————————–
Thanks with a Gift!
Thanks for sticking with this long read. If you managed to arrive to this point I sincerely think that you found this reading an interesting one and I really appreciate it. As a small token for your interest, may I remind you that if you simply create an account with our online show you will be instantly given a one time, no expiry 10% Discount Coupon. You will be able to find it in the coupon section of the My Account Section in the links section above.
Thanks for appreciating our Art!


Great work! Would you reinforce the sword differently if you had to do it all over again?
Surely yes! I would leave the print as it is but us the present male / female connections as reference points for drilling holes precisely to insert metal rods.
Learning from mistakes is key. Have you ever had a failed project you couldn’t save?
Yes one. I remember it well. It was a hell brute which I bought cheaply preprinted with the intention of stripping the paint and convert and repaint it. Unfortunately the paint stripper I used was too strong and melted the plastic too. I could not recover it in any way.
I’ve been following this project from the start, and seeing how you overcame this setback is truly inspiring. Many people would have scrapped the piece and started over, but your problem-solving approach and attention to detail saved the entire project!
I have a question about your process. Do you think a thicker wall thickness in the original 3D print would have prevented the break in the first place?
Thanks for sharing your experience—it’s a great learning opportunity for all of us.
I could not make the blade thicker because it would not have been true to the original.
The blade looks flawless after your repair! How long did the entire restoration process take?
24hrs x2 for the resin to cure and totally harden for sure. Some 5hrs more of work in sanding, painting and polishing.
Amazing fix! Do you think resin prints would have been stronger than PLA for this project?
resin could have been stronger but what kept me back is that it would have been much more brittle once dry. This would have mad the 81cm blade much more prone to breaking due to it being much less flexible as is PLA.
What an amazing journey! How did you manage to match the paint perfectly after fixing the crack?
I did not match the paint. I repainted the blade from scratch giving it 2 new coats of white and black primer and luckily I still had my old chrome spray can.