


3D Printed Headless Horseman Sword 1:1 Replica – The Final Reveal!
Some projects test your patience, skill, and passion—and this 3D printed replica of the Sleepy Hollow Headless Horseman Sword was one of them! From intricate modeling and printing to the heartbreak of seeing it shattered, this project was a rollercoaster. But today, I’m beyond thrilled to share the final reveal of this 1:1 scale masterpiece.

Sleepy-Holow-Headless-Horseman-1-1Replica@dressart3d.com

“Discover the art of 3D modelling as we recreate the iconic Hessian Horseman Sword from Sleepy Hollow. From inspiration to creation, see how dreams take shape!”
For over 35 years, I’ve painted and designed miniatures, but creating a full-sized sword was a whole new challenge. If you’ve been following my journey, you know this wasn’t easy—but I wouldn’t have it any other way. Whether you’re a seasoned maker or just starting with 3D printed projects, I hope this inspires you to push the limits of your creativity.
Before we dive in, a huge thank you to everyone who has supported DressArt3D.com by purchasing miniatures, t-shirts, and commissions. Your support directly funds projects like this, and I couldn’t do it without you! If you love seeing unique 3D printed creations, check out our store and help bring more ambitious projects to life.
Now, let’s dive into the final steps of this 3D printed journey!
Why the Headless Horseman Sword?
A Legendary Blade Worth Bringing to Life
There’s something hauntingly beautiful about the Headless Horseman Sword from Sleepy Hollow. The mix of gothic elegance, historical weaponry, and eerie legend made it the perfect choice for a full-scale 3D printed replica.
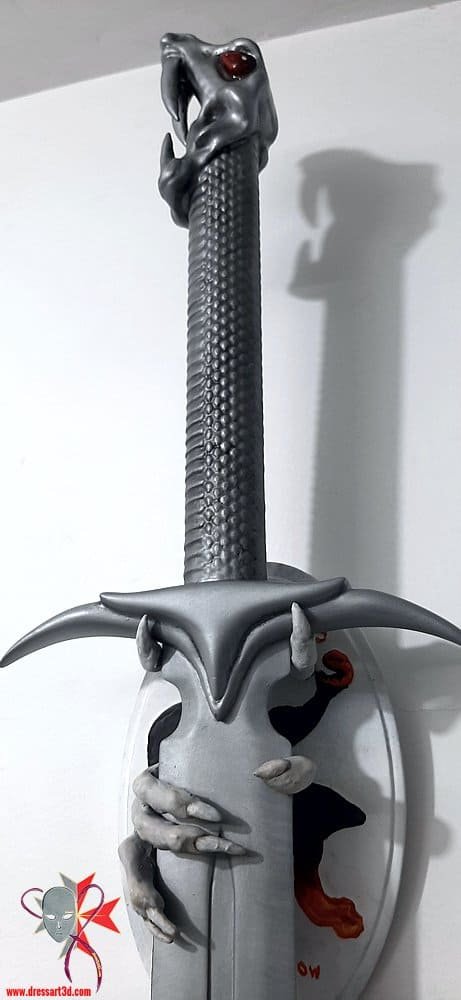
I’ve always loved the craftsmanship of swords in movies, and this one stood out. The serpentine pommel, bold cross guard, and deadly straight blade all enveloped in such a simple but functional design made it my favorite blade of all times —everything about it screamed challenge accepted!
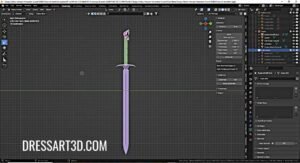
The 3D Printed Replica Modeling Process
From Concept to Digital Model
- I started by designing the sword in Blender, ensuring every detail matched the movie prop by directly modelling on a reference photo.
- The sword was split into multiple printable sections:
- Pommel (snake head)
- Handle
- Cross guard
- Blade (split into four sections for printing)
3d-Modelling-the-Sleepy-Hollow-Hessian-Sword-@ dressart3d.com

Printing Challenges and Triumphs
Printing a 1:1 scale sword isn’t as simple as hitting “print.” It required:
✅ PLA material for durability and affordability.
✅ High-resolution settings to capture the intricate details.
✅ Strategic supports and print orientation to minimize post-processing work.
The result? A fully 3D printed sword, ready for assembly—but not without its challenges!
The Heartbreak: A Shattered Dream (and How I Fixed It!)
Disaster Strikes: The Blade Breaks in Half
One of the hardest moments in this project was seeing the fully assembled blade shattered on the floor after a gust of wind knocked it down.
For a moment, I was ready to give up. All that work—gone. But after stepping away for a day, I decided to repair and reinforce the blade instead of starting over.

Replacing the 3d printed pins with metal pins
Reinforcing the 3D Printed Blade
- Metal Pins for Strength – Instead of relying only on epoxy, I drilled and inserted metal rods into the connection points.
- Stripping Paint for a Stronger Bond – I removed all paint from the joint area to ensure maximum adhesion.
- Realigning the Blade – The hardest part was keeping the fuller (the groove along the blade) perfectly straight during reassembly.
- Sanding and Filling Imperfections – I used car body filler to smooth out any flaws and restore the blade’s seamless look.
This process took hours of careful work, but in the end, the blade was stronger and straighter than ever!
Final Assembly and Detailing
Bringing All the Pieces Together
With the blade fully restored, it was time to join it to the handle and pommel:
✅ Epoxy for a Strong Bond – Applied generously to the connection points.
✅ Alignment is Everything – Used a flat wooden board and bubble level to ensure everything was perfectly straight.
✅ 24-Hour Curing Time – Gravity helped keep the blade in place while the glue hardened.
Adding the Final Touches
- Gem-Like Eyes for the Snake Pommel – I painted them to resemble rubies, finishing with a high-gloss coat.
- Clear Coat Protection – Sealed the entire sword to protect the paint from scratches.
- Final Buffing – Gave the blade a subtle metallic dry-brush effect to enhance realism.
The Final Reveal: A 3D Printed Masterpiece

Sleepy-Holow-Headless-Horseman-1-1Replica@dressart3d.com
Seeing the fully assembled, painted, and detailed sword in my hands was a surreal moment after countless giving up ones.
This wasn’t just a 3D printed model—it was a true labor of love, combining technical skills, artistry, and pure determination.
I’ve tackled many projects in my career, but this one stands out. It tested my problem-solving, patience, and ability to adapt when things went wrong.
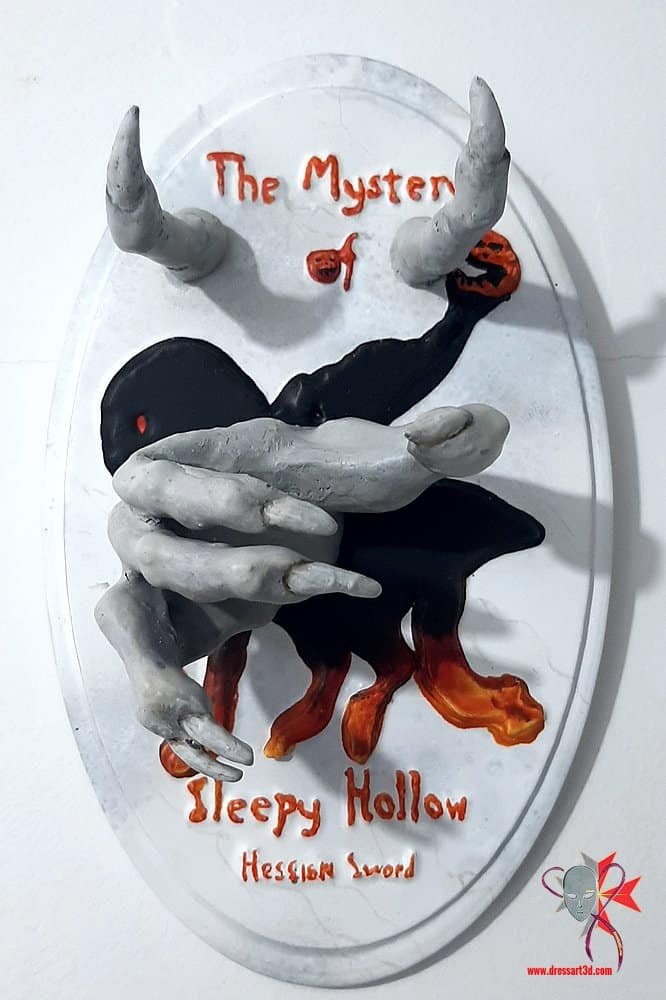
And now, after all the setbacks, the Sleepy Hollow Headless Horseman Sword is COMPLETE and hangs proudly on my display wall.
How Will It Be Displayed?

Sleepy-Holow-Headless-Horseman-1-1Replica@dressart3d.com
Custom Wall Mount in finished!
No masterpiece is complete without a proper display! I’ve designed a custom wall mount to showcase the sword in its full glory.

Sleepy-Holow-Headless-Horseman-1-1Replica@dressart3d.com
However, I ran into one last challenge—the mount was not holding the blade perfectly straight yet. But don’t worry! After countless adjustments, I can now reveal the final display setup.
Check the photos with this article and the fully gallery and video here:
Lessons Learned from This 3D Printed Project
🔹 Patience is Key – Every step, from design to finishing, required time and careful execution.
🔹 Never Rush the Curing Process – Taking shortcuts with glue or paint can ruin hours of work.
🔹 Adapt and Overcome – The broken blade felt like a disaster, but problem-solving turned it into a success.
🔹 Support Matters – The encouragement from the DressArt3D community kept me going.
Support More 3D Printed Creations!
If you enjoyed following this project, help bring more creations to life by supporting DressArt3D.com!
✅ Get professionally painted miniatures for tabletop gaming
✅ Shop unique t-shirts, mugs, and merch inspired by fantasy & sci-fi
✅ Commission a custom project – Have a vision? Let’s make it real!
Every purchase helps fund bigger and better projects—including more full-scale 3D printed replicas!
Final Thoughts: This Is Just the Beginning!
What started as a crazy idea became a fully realized, 3D printed masterpiece. From overcoming setbacks to adding final details, this sword represents passion, patience, and persistence.
And this is just the beginning!
I’d love to hear from you—what legendary weapons or props would you love to see 3D printed next? Drop a comment below or reach out at contact@dressart3d.com!
➡️ Explore our store at DressArt3D.com and let’s keep creating amazing things together! 🎨🔥
———————————————————————————————–
Thanks with a Gift!
Thanks for sticking with this long read. If you managed to arrive to this point I sincerely think that you found this reading an interesting one and I really appreciate it. As a small token for your interest, may I remind you that if you simply create an account with our online show you will be instantly given a one time, no expiry 10% Discount Coupon. You will be able to find it in the coupon section of the My Account Section in the links section above.
Thanks for appreciating our Art!


Incredible work! How did you achieve such a smooth finish on the blade?
lots of patience in sanding and a good eye 🙂 Priming the surface white or grey helps as well.
Emma Davis (USA): I love the final reveal! The hidden wall mount feature is such a smart idea.
The amount of dedication and patience you put into this project is incredible!
I would love to commission a custom piece from you. Do you take orders?
Depending on your project yes. Contact me at contact@dressart3d.com
I’ve been following this project from the very beginning, and the final reveal exceeded all expectations! Your dedication to recreating the Headless Horseman Sword in 1:1 scale is truly inspiring. What impressed me the most is how you overcame every setback—from the broken blade to achieving that perfect metallic finish.
But what really caught my attention was the secret wall mount—such a brilliant way to display this masterpiece! It blends seamlessly, making it look like the sword is floating on the wall, just waiting to be wielded!
One question—will you be offering this wall mount as a separate item for collectors? I’d love to display some of my own swords in a similar fashion. Amazing work, and I can’t wait to see what you create next!
Yes if you wish I can make another mount for you but you will have to give me the measurement of the width of the blade and you will have to check on the weight of the blade if it is a metal made replica. Contact me @ contact@dressart3d.com.