


🏺 Restoration Commission: Green Ceramic Vase Final Reveal – A Satisfying Journey
Welcome to the Final Reveal of This Restoration Commission!
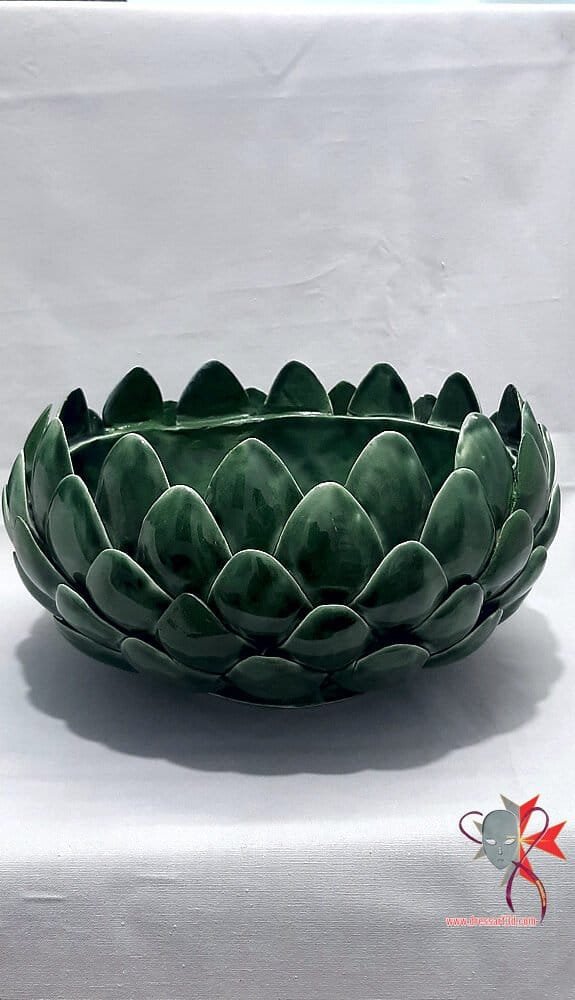
Full Gallery of this restoration Project can be found here. Green Ceramic Vase Restoration Project.
Some restoration projects challenge you to your core. Others surprise you by how rewarding they become. This one? It was both. The green ceramic vase from Villa Bronja—a delicate piece made of overlapping flower-petal shapes—put me through a rollercoaster of sculpting, sanding, and careful painting.
But today, I’m excited to finally reveal the finished piece and share how everything turned out.
As someone who’s been painting miniatures for over 35 years and restoring art for quite some time now, this restoration commission gave me a chance to blend technical skill with artistic judgment in a big way.
Restoration Commission Recap – From Broken Petals to Beautiful Finish
The Start of a Complex Challenge
When Steve P., the client who had previously trusted me with a ceramic Nativity icon, handed over this vase, I knew I had my work cut out for me.
The piece was structurally sound, but it had:
- Five missing petal tips
- Several chipped and cracked areas
- A watercolor-like paint style that was nearly impossible to replicate
Even with years of experience restoring miniatures and ceramics, I wasn’t sure I’d be able to fully pull it off—but I accepted the challenge.
Pinning, Sculpting, and a Few Surprises
Structural Stability Through Pinning
The first step in any fragile ceramic restoration commission is structural support. Drilling into ceramic is a delicate task. I used carbide bits and drilled very slowly, making sure not to crack the thin petals. I then inserted and glued metal pins in place to act as anchors for the sculpted clay petals.
Each pin took time. Each hole was carefully aligned. It’s a slow process, but absolutely critical if you want a lasting restoration.
Sculpting the Missing Petals
Once the pins had cured, I began applying air-drying clay to recreate the missing shapes. I worked in layers, letting the clay dry before continuing. Over the next few days, I shaped each petal by hand, blending them into the original vase as much as possible.
At this stage, everything still looked rough, but that’s part of the journey.
Sanding, Smoothing, and Sealing the Sculpt
Sculpting by Subtraction
After letting the clay cure completely, it was time to sand the petals down to match the form, size, and thickness of the originals. I started with 160 grit sandpaper to shape, followed by 240 grit for smoothing.
This is where having extra material to work with helped a lot. I always add more clay than needed during sculpting—better to sand off than not have enough.
I masked off the rest of the vase carefully to avoid damaging the original paint during sanding. Some areas were so thin and fragile I had to use extremely light pressure and work with high precision.
Super Glue Sealing for Strength
Once the sanding was complete, I dusted off the vase and applied a thin layer of super glue to the sculpted areas. This seals the clay, strengthens it, and prepares the surface for paint. After that dried, I could finally move on to the phase that gives every restored piece its final personality—painting.
Painting the Green Vase – An Artist’s Trial and Triumph
Matching a Watercolor-Like Finish
Now here’s where things got especially tricky. The original vase had a faded green-to-white watercolor-like glaze. Reproducing that effect with acrylic paints and an airbrush wasn’t going to be easy.
I mixed a custom green using a base tone and adding lighter and darker greens plus a bit of black. Thankfully, I had written down the original mix formula when I ran out. (Pro tip: Always write down your paint formulas!)
Then I went layer by layer—using an airbrush to carefully build the color, switching between hair-drying and air-drying methods to get the desired fade.
An Unexpected Setback and a Clever Fix
Midway through the job, disaster struck: the rubber airbrush hose melted when I accidentally rested the hairdryer’s metal nozzle on it.
With no way to replace it quickly, I stepped away, went for a bike ride to clear my head (a little ritual of mine), and returned with a plan.
I used medical tape and liquid super glue to patch the hose. Believe it or not—it worked! And I was able to finish the airbrushing without further issues.
Adding Subtle Details
To finalize the blending, I added soft brush glazes and ink washes between airbrush layers. I used very diluted paint to get smooth transitions. It was a delicate balance of instinct and experience—watching how each layer dried and adjusting as needed.
The Big Reveal – A Restoration Commission Success
Final Varnish and Client Reaction
Once the paint was fully dry, I sealed everything with a matte clear coat followed by a gloss varnish to match the original ceramic shine.
Removing the masking tape was nerve-wracking, but the result was well worth it.
When Steve saw the restored vase for the first time, his face said it all—“It’s perfect. I can’t even tell where the repairs were done.” That’s the highest compliment you can get in this line of work.
Final Thoughts – A 20-Hour Journey Worth Every Minute
What This Restoration Commission Taught Me
In total, I spent around 20 hours on this project, and I enjoyed every bit of it—even the part where I had to MacGyver an airbrush hose. Projects like this remind me why I love what I do: every repair has a story, and every restoration breathes new life into something someone cares about.
Help Us Keep Restoring Beautiful Things at DressArt3D
If you’ve enjoyed following this restoration commission, consider supporting us at
👉 dressart3D.com – Unique 3dPrinted Painted Miniatures & merch
Here’s how you can help:
- Buy a hand-painted tabletop miniature for your collection or gaming
- Rock an exclusive DressArt3D t-shirt
- Commission your own custom restoration or miniature design
Every purchase helps fund more art, more restorations, and more stories like this.
Ready for Your Own Restoration Commission?
Have something special you’d like restored? Or want your tabletop miniatures painted to pro standards?
📩 Email me at contact@dressart3d.com
🔗 Or visit dressart3D.com to browse and support our work.
Thanks for reading—and see you at the next project reveal!
Let me know if you’d like me to generate the featured image, meta tags, or social captions next!
———————————————————————————————–
Thanks with a Gift!
Thanks for sticking with this long read. If you managed to arrive to this point I sincerely think that you found this reading an interesting one and I really appreciate it. As a small token for your interest, may I remind you that if you simply create an account with our online show you will be instantly given a one time, no expiry 10% Discount Coupon. You will be able to find it in the coupon section of the My Account Section in the links section above.
Thanks for appreciating our Art!
")


I’ve been following your ceramic restoration commissions closely, and this final reveal truly exceeded my expectations. As someone who works on tabletop miniatures, I appreciate the precision involved, especially in matching colors and dealing with fragile surfaces. Your method of documenting the painting process, from masking to glaze matching, was super educational. I’ve struggled with masking delicate textures in the past and seeing how meticulous you were gave me a new perspective.
Also, thank you for being so honest about the challenges (like the airbrush hose incident!). It’s refreshing to read a restoration blog that doesn’t shy away from the real moments behind the craft. Can’t wait to see what you’ll tackle next!
Just wow. The transformation is truly next level!
I’ve learned so much from your vase project. Thank you for sharing!
Wow! I wouldn’t believe it was ever broken. Beautiful restoration!
The airbrush work on the vase is flawless. Kudos!
What kind of varnish did you use for the final finish?
I’m new to restoration work, but this article has me hooked! I never realized how much work goes into bringing a broken ceramic piece back to life. The way you handled the sculpting, painting, and even redoing the petals really shows how passionate you are about your art. The fact that the client was also thrilled makes it all the more inspiring.
I have a small broken figurine from my grandmother I’ve been afraid to touch, but now I’m seriously thinking of giving it a try. Maybe I’ll start by ordering some tools and paints—and a few of your miniatures from dressart3D.com to practice on too. Thanks for sharing this journey!